Monday, April 29, 2013
Thursday, April 25, 2013
BITTORRENT SYNC: SECURE FILE SYNC BETWEEN COMPUTERS USING P2P TECHNOLOGY [PUBLIC ALPHA]
BitTorrent Sync, a free to use (but not open source) tool that can be used to automatically synchronize files between computers using the BitTorrent protocol, is now available for all as public alpha. The application runs on Linux, Windows, Mac OS X and NAS.

The tool, which has been in closed alpha for the past four months, is advertised as "a simple tool that applies p2p protocol for direct live folder sync with maximum security, network speed and storage capacity".
And indeed, BitTorrent Sync is a great way of syncing and sharing files between computers, even files that you usually wouldn't trust with cloud sync tools such as Dropbox: besides the files being transferred directly between the users (so your files don't end up on some cloud server), the connection is encrypted with a AES cypher and a 256-bit key created on the base of your Secret, a random 20 byte or more string. For increased security, there's also an option to generate a Secret that expires after a day.
Basically, this peer-to-peer (p2p) sync tool can be compared with cloud sync services such as Dropbox or Ubuntu One, but no server is involved which also means that the sync can be faster than such services and there are no space restrictions (except your HDD). This also means the computers need to be online for the sync to work, obviously.
How to use BitTorrent Sync on Linux
Arch Linux users can install BitTorrent Sync via AUR.
To use BitTorrent Sync (or "BtSync") on Linux, download and extract the binary for your architecture (Ubuntu users: use the "Linux i386" or "Linux x64" links on the left; don't download the "glib 2.3" binaries), extract it and to run it, simply type the following in a terminal (assuming you've extracted the "btsync" binary in your home folder):
./btsync
To see a list of available options, type:
./btsync --help
And if you want to stop BitTorrent Sync, use:
killall btsync
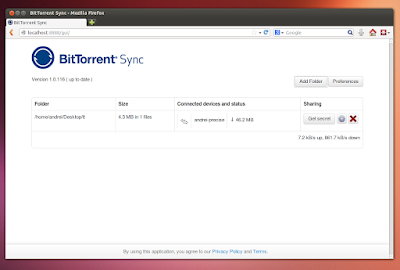
BitTorrent Sync doesn't come with a GUI for Linux, but it can be configured through a web interface so once you've started BtSync like we've explained above, open a web browser and enter the following URL: http://localhost:8888/gui/
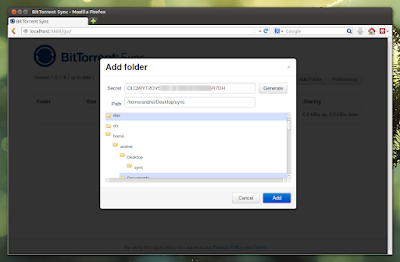
Now let's add a folder to sync. To do this, click "Add folder", then browse for a folder you want to sync and also click "Generate" to generate a Secret for this folder. Then click "Add" to add the folder:

If you want to connect to other devices / synchronize a folder from a remote computer on your machine, follow the same steps as above, but instead of clicking "Generate" for the Secret, paste the Secret generated for the folder from the remote computer.
On Linux, most of the settings aren't available in the web interface. Instead, you can run:
./btsync --dump-sample-config > sync.conf
Which will create a new "sync.conf" file with a sample configuration file. Modify the settings in this file to suit your needs and then run BtSync using the following command (which will make BtSync use the newly created configuration file):./btsync --config sync.conf
For more on how to use BitTorrent Sync on Linux but also on Windows and Mac OS X, see the User Guide PDF file.
Download BitTorrent Sync for Linux, Windows, Mac OS X and NAS.
Friday, April 19, 2013
The differences of RAM DDR1, DDR2, DDR3
DDR2: 100MHZ - 133MHZ 1600MB/s - 2133MB/s
DDR3 : 133MHZ 2666MB/s
Power consuming : DDR > DDR2 > DDR3
DDR1 : 2.5 V
DDR2 : 1.8 V
DDR3 : 1.5 V
Price : DDR > DDR2 > DDR3
because of its availability.
Size : the 3 RAMs have the same size but different notch position, take a look at the picture.
Thursday, April 18, 2013
Fix auto-mute function when a headphone is plugged into your linux machine.
Normally the speakers of your laptop is automatically in mute state when you plug the earphones or headphones, and if you're having problem with the aut-mute function when your plug a headphone or earphones on ubuntu or any linux operating system, means both speakers and headphones are all having
the sound from your machine here is a simple fix :
- Open terminal and hit this command line :
sudo gedit /etc/modprobe.d/alsa-base.conf
- add this line at the end of the line :
options snd-hda-intel model=auto probe_mask=1
- Reboot and done.
the sound from your machine here is a simple fix :
- Open terminal and hit this command line :
sudo gedit /etc/modprobe.d/alsa-base.conf
- add this line at the end of the line :
options snd-hda-intel model=auto probe_mask=1
- Reboot and done.
Friday, April 5, 2013
Subscribe to:
Comments (Atom)